The Print Medium: Techniques and tools of the trade
Author-Ria Sarkar, For Eikowa
When we talk of prints, they are usually understood to be a copy of an original. This is only partly true, as the history of printmaking is not just associated with making multiple images from a single print. The medium has developed into a branch of Fine Art that is centered on the replication of images through a variety of techniques onto wood, paper, metal and fabrics among other materials. As compared to paintings or sketches, these are not precisely ‘original’, but they are nevertheless considered to be works of art in their own right, even if there may be more than one of the same print. In fact, conventional fine prints are usually produced in limited edition sets, each print being numbered and signed by the artist, accrediting them with a much higher value than prints that are replicated in large numbers.

The base plate or surface from which a print is made is called a ‘matrix’. The beauty of this art form is that today, the artist-printmaker has the freedom to choose from a large variety of materials such as metal, stone, wood blocks and linoleum among others to replicate a painting flawlessly. The diverse techniques of printmaking can be broadly divided into three principal methods – Relief process, Intaglio and Planography. Each method has further sub-variations differing across materials. Artists can incorporate more than one method as well as subsequent variations of each into making a single print.
- Relief printing
Relief is a method of cutting into a flat surface to create forms or shapes that appear to stand out from it. In relief printing the base material is cut down, leaving a raised image that takes the ink. While making sure the background (incised area) is untouched, paper is pressed onto the raised part with a roller or brayer to make a print. Wood and linoleum are the most popular materials used in relief printing because they are easy to cut into using basic cutting tools.
Woodcut
Woodcut printing began in China as early as the 5th century CE, arriving in Europe almost six centuries later, making it one of the first techniques of fine art printmaking. It was originally used for stamping designs onto fabrics, textiles, or playing cards. By the 16th century it developed into a viable art form through the work of famous German artist Albrecht Dürer. It also gained popularity during the Edo period in 17th century Japan through the form of Ukiyo-e woodblock prints.
Woodcuts are created using the broad face of a plank of wood. While working the block, a knife is used to skillfully cut away areas to make an image. These cut portions appear as white areas in the final print while the ink takes to the raised area.
 Woodcutting process and tools
Wood Engraving
This process uses tools similar to metal engraving (explained further on in the article). Here polished blocks of end-grain wood (usually boxwood) are incised with a metal needle. Unlike intaglio-engraving method, instead of producing lines that will print, tools are used to produce non-printing lines and the uncut surface takes the ink. The difference between woodcuts and wood engraving is the use of engraving tools, and the block of wood is cut along the growth rings rather than the plank area of a trunk.

A Wood engraving with its prints
Linocut
Lino cut or linoleum cut is a process of creating prints using linoleum, a soft textured material that can be effortlessly cut into. The material is known for its versatility in producing a wide range of effects and takes to all types of lines. Bold designs with Linoleum bases are cut with small pen-like tools, which have a mushroom-shaped handle. The tools have a variety of forms: straight and rounded edge, double-pointed, as a chisel or a V-shaped chisel, etc. As on a woodcut, the relief parts of the block are inked.

Linocut process and cutting tools
- Intaglio
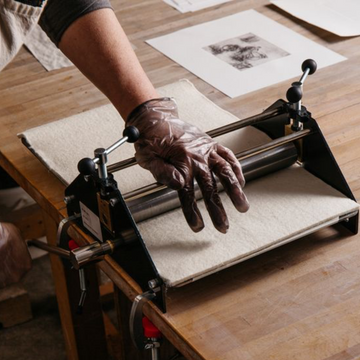
Coming from the Italian word 'intagliare' meaning ‘to engrave’, Intaglio is the complete opposite of relief printing. Here the base plate is incised with a sharp-pointed tool (metal needle or burin) and the grooves or crevices are inked, leaving the raised area blank. This is achieved by rubbing printing ink into the incisions and the elevated surface wiped clean before pressing dampened paper onto the surface. Once the inking process is completed, an enormous amount of pressure is applied on the paper in order to get the print.
Intaglio process is preferred by printmakers for its versatility in producing a wide range of effects from delicate, intricate designs to bold simple images. Its appeal also lies in the rich texture of the printed surface, which is a consequence of the high pressure applied.
Engraving
One of the primary methods of intaglio printing, Engraving can be traced back to 15th century Germany and Italy, where it was essentially developed through the works of goldsmiths. In Italy, this method drew inspiration from goldsmith’s art as well as niello work, a type of decorative metalwork.
The process involves incising an image onto a metal plate with the help of a steel tool with a square or diamond-shaped end, called a ‘burin’. This tool allows the artist to get a clean sharp linear incision, almost to surgical precision. The only drawback of being able to engrave fine lines is the inability to get flat areas of tone, which is incorporated through cross-hatching and stippling. Also known as copper-plate engraving, since copper is the most preferred metal for this method today, engraved prints were extremely popular till mid-19th century as it was the top choice for replicating fine art images on paper, as well as making illustrations in books and magazines. With the discovery of etching and other evolved engraving techniques such as mezzotint, it has since lost its initial appeal.

Burins (left) | Andrea Mantegna, Virgin and Child, 1490
Drypoint
The equivalent of sketching on paper, in Drypoint technique lines are scratched into the metal plate using any sharp instrument with the same freedom as a pencil. The scratching produces rough ridges of displaced metal called ‘burr’ on either side of the cut that gives a soft textured look to the final print. This technique is often used along with other intaglio processes to add textural depth and body to a design.

Rembrandt, Christ Crucified between the Two Thieves: The Three Crosses, 1653
Mezzotint
Mezzotint meaning ‘halftone’ in Italian is a variation of the engraving process used by artists to incorporate subtle gradations of tone. An instrument with a toothed edge (called a ‘rocker’ or ‘cradle’) is used to evenly prick the entire surface of the base plate to create small holes that will hold the ink. The resulting effect on the print is large even areas of tone made by scraping the plate with smoothers and burnishing tools. When combined with line engraving or etching, mezzotints produce greater definition to a print making it possible to accurately reproduce paintings and eliminate the need of laborious cross hatching and stippling.

(From left to right) Mezzotint rocker, Contemporary mezzotint copper plate
Etching
Etchings are made by incising a design onto a metal plate with the help of acid. Traditionally, a plate made of copper, zinc or steel is coated with an acid resistant ‘ground’ made of beeswax, bitumen and resin, upon which the printmaker executes a design. The plate is then immersed in nitric acid, which eats into the exposed metal areas, resulting in the formation of lines. These lines are then filled with ink that is transferred onto moist paper by pressing it down with an etching press.
Etchings found their way into printmaking around the 15th-16th century in Europe. Originally used to etch designs into armor, etching was adopted by artists as an easier substitute to engraving, as it allowed them to play around with light and space through the wax-like ground. Moreover, it can be easily combined with engraving and other techniques as the carving process can be repeated more than once. Celebrated Dutch artist Rembrandt created over 300 etchings and his contributions, among others led future artists like Picasso and Matisse to further experiment with this method.

Albrecht Dürer, St. Anthony At the City, 1513
Aquatint
In order to provide tonal variations in line etching printmakers came up with aquatint. This is a variation of the etching process made without using a metal needle. Instead of a regular wax ground, aquatints are developed using melted granulated resin as a ground. Once immersed in an acid bath, the acid bites into the plate only in the cracks between the grains of resin, thereby creating even tones of color which gives a watercolor-like effect. Numerous tones can be achieved by exposing different parts of the plate to acid baths of different strengths for different periods of time, based on the requirements.

Francisco Goya, Estan calientes (They are hot), Aquatint and Etching, 1746-1828
- Planography (surface-printing)
While Relief and Intaglio methods involve carving or cutting out a pre-prepared design onto the matrix, Planography or ‘surface printing’ is a technique where the image is drawn directly onto the base plate. In other words, there is no difference in level between the inked surface and the non-inked surface. In this process, the entire matrix is part of the printing process, but some areas are treated to retain the ink.
Lithography
One of the primary planographic techniques, Lithography involves drawing designs with a greasy crayon onto a stone matrix, which is dampened with water before taking a print. As oil repels water, the grease in the crayon blocks the printing ink that is applied to the whole surface thereby retaining the design. Additionally, to prevent the grease from spreading, a mixture of gum arabic and nitric acid is applied on the finished drawing, which is washed off during the final step of printing. Limestone is the preferred matrix in this process although zinc and aluminum plates are also used.
An interesting variation called Offset lithography was developed where the inked image is printed on a rubber cylinder and then transferred (i.e., offset) to paper. The use of a roller allows the artist-printmaker flexibility in terms of materials, making it possible to print on surfaces other than the traditional limestone. More importantly, the artist does not have to reverse the image as the offsetting prints the image in the same alignment as the original design. Color lithographs, called chromolithographs or oleographs also became popular during the second half of 19th century.

Lithography Process
Monotype
As the name suggests, this type of printmaking can only yield a single (mono) print at a time. The process involves directly drawing a design with printer’s ink or oil paint onto a smooth surface. Once the drawing is completed, a paper is gently pressed onto the painted surface by hand or with a press.
The key is to use a greasy ink in order for it to get absorbed onto the paper in one go, but sometimes there is enough leftover ink to make a second, albeit slightly feebler impression. Since this process does not allow mass replication of a single image, the prints qualify as true originals.
Screen Printing
Serigraphy or screen-printing is one of the newer methods of intaglio printmaking developed in the 20th century from traditional stenciling. Serigraphy is derived from the Latin word ‘sericum’ meaning silk, which is why it is also known as silkscreen printing. Originally used for advertisements and display work, the process uses a modern stencil made of silk or other fabrics (cotton, nylon) stretched tightly over a wooden frame. The design is drawn on paper and cut out in the form of a stencil, which is in turn attached to the mesh screen. Finally, the ink is sprayed, rubbed or rolled onto a surface that takes the print.

Andy Warhol, Liz #1(left), screen printing process (right)
Printmaking today: Digital and Giclée prints
With advancements in technology, high quality printers were created designed specifically for mass production of high quality prints. The IRIS printer was and still remains a standard for fine art digital printmaking since its invention in 1991. Other large-format printers from manufacturers such as Epson and HP have taken over the contemporary market for their use of fade-resistant, archival inks (pigment-based, as well as newer solvent-based inks), and archival substrates specifically designed for fine-art printing.
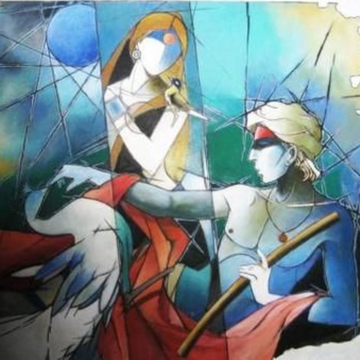
The latest trend in digital printmaking is Giclée prints. This process uses inkjet printers to produce supreme quality photographic prints of two-dimensional artworks that include photographs, computer graphics and other computer generated images printed from digital files. The word "Giclée" meaning ‘to spray or squirt’ in French, refers to an inkjet printer’s capability to spray more than 4 million microscopic droplets of ink per second onto canvas or paper.

A Giclée print with the original
Despite the artistic process of printmaking being taken over by machines, for the contemporary artist, a long history of traditional and modern techniques is at their behest to explore. Some of the most popular processes such as silkscreen printing, linocuts and woodblock printing are taught at schools and others at Fine art training institutions. Unlike the artists who were testing out these methods, the present generation of artists has the ability to combine multiple methods and use modern tools that provide the most effective results.